This is the multi-page printable view of this section. Click here to print.
Selenium 3
1 - Grid 3
You can read our documentation for more information about Grid 4
Selenium Grid is a smart proxy server that allows Selenium tests to route commands to remote web browser instances. Its aim is to provide an easy way to run tests in parallel on multiple machines.
With Selenium Grid, one server acts as the hub that routes JSON formatted test commands to one or more registered Grid nodes. Tests contact the hub to obtain access to remote browser instances. The hub has a list of registered servers that it provides access to, and allows control of these instances.
Selenium Grid allows us to run tests in parallel on multiple machines, and to manage different browser versions and browser configurations centrally (instead of in each individual test).
Selenium Grid is not a silver bullet. It solves a subset of common delegation and distribution problems, but will for example not manage your infrastructure, and might not suit your specific needs.
2 - Setting up your own Grid 3
To use Selenium Grid, you need to maintain your own infrastructure for the nodes. As this can be a cumbersome and time intense effort, many organizations use IaaS providers such as Amazon EC2 and Google Compute to provide this infrastructure.
Other options include using providers such as Sauce Labs or Testing Bot who provide a Selenium Grid as a service in the cloud. It is certainly possible to also run nodes on your own hardware. This chapter will go into detail about the option of running your own grid, complete with its own node infrastructure.
Quick start
This example will show you how to start the Selenium 2 Grid Hub, and register both a WebDriver node and a Selenium 1 RC legacy node. We will also show you how to call the grid from Java. The hub and nodes are shown here running on the same machine, but of course you can copy the selenium-server-standalone to multiple machines.
The selenium-server-standalone package includes the hub,
WebDriver, and legacy RC needed to run the Grid,
ant is not required anymore.
You can download the selenium-server-standalone.jar from
https://selenium.dev/downloads/.
Step 1: Start the Hub
The Hub is the central point that will receive test requests and distribute them to the right nodes. The distribution is done on a capabilities basis, meaning a test requiring a set of capabilities will only be distributed to nodes offering that set or subset of capabilities.
Because a test’s desired capabilities are just what the name implies, desired, the hub cannot guarantee that it will locate a node fully matching the requested desired capabilities set.
Open a command prompt
and navigate to the directory where you copied
the selenium-server-standalone.jar file.
You start the hub by passing the -role hub flag
to the standalone server:
java -jar selenium-server-standalone.jar -role hub
The Hub will listen to port 4444 by default. You can view the status of the hub by opening a browser window and navigating to http://localhost:4444/grid/console.
To change the default port,
you can add the optional -port flag
with an integer representing the port to listen to when you run the command.
Also, all of the other options you see in the JSON config file (seen below)
are possible command-line flags.
You certainly can get by with only the simple command shown above, but if you need more advanced configuration, you can also specify a JSON format config file, for convenience, to configure the hub when you start it. You can do it like so:
java -jar selenium-server-standalone.jar -role hub -hubConfig hubConfig.json -debug
Below you will see an example of a hubConfig.json file.
We will go into more detail on how to provide node configuration files in step 2.
{
  "_comment" : "Configuration for Hub - hubConfig.json",
  "host": ip,
  "maxSession": 5,
  "port": 4444,
  "cleanupCycle": 5000,
  "timeout": 300000,
  "newSessionWaitTimeout": -1,
  "servlets": [],
  "prioritizer": null,
  "capabilityMatcher": "org.openqa.grid.internal.utils.DefaultCapabilityMatcher",
  "throwOnCapabilityNotPresent": true,
  "nodePolling": 180000,
  "platform": "WINDOWS"}
Step 2: Start the Nodes
Regardless of whether you want to run a grid with new WebDriver functionality,
or a grid with Selenium 1 RC functionality,
or both at the same time,
you use the same selenium-server-standalone.jar file to start the nodes:
java -jar selenium-server-standalone.jar -role node -hub http://localhost:4444
If a port is not specified through the -port flag,
a free port will be chosen. You can run multiple nodes on one machine
but if you do so, you need to be aware of your systems memory resources
and problems with screenshots if your tests take them.
Configuration of Node with options
As mentioned, for backwards compatibility “wd” and “rc” roles are still a valid subset of the “node” role. But those roles limit the types of remote connections to their corresponding API, while “node” allows both RC and WebDriver remote connections.
Passing JVM properties (using the -D flag
before the -jar argument)
on the command line as well,
and these will be picked up and propagated to the nodes:
-Dwebdriver.chrome.driver=chromedriver.exe
Configuration of Node with JSON
You can also start grid nodes that are configured with a JSON configuration file
java -Dwebdriver.chrome.driver=chromedriver.exe -jar selenium-server-standalone.jar -role node -nodeConfig node1Config.json
And here is an example of a nodeConfig.json file:
{
  "capabilities": [
    {
      "browserName": "firefox",
      "acceptSslCerts": true,
      "javascriptEnabled": true,
      "takesScreenshot": false,
      "firefox_profile": "",
      "browser-version": "27",
      "platform": "WINDOWS",
      "maxInstances": 5,
      "firefox_binary": "",
      "cleanSession": true
    },
    {
      "browserName": "chrome",
      "maxInstances": 5,
      "platform": "WINDOWS",
      "webdriver.chrome.driver": "C:/Program Files (x86)/Google/Chrome/Application/chrome.exe"
    },
    {
      "browserName": "internet explorer",
      "maxInstances": 1,
      "platform": "WINDOWS",
      "webdriver.ie.driver": "C:/Program Files (x86)/Internet Explorer/iexplore.exe"
    }
  ],
  "configuration": {
    "_comment" : "Configuration for Node",
    "cleanUpCycle": 2000,
    "timeout": 30000,
    "proxy": "org.openqa.grid.selenium.proxy.WebDriverRemoteProxy",
    "port": 5555,
    "host": ip,
    "register": true,
    "hubPort": 4444,
    "maxSession": 5
  }
}
A note about the -host flag
For both hub and node, if the -host flag is not specified,
0.0.0.0 will be used by default. This will bind to all the
public (non-loopback) IPv4 interfaces of the machine. If you have a special
network configuration or any component that creates extra network interfaces,
it is advised to set the -host flag with a value that allows the
hub/node to be reachable from a different machine.
Specifying the port
The default TCP/IP port used by the hub is 4444. If you need to change the port please use above mentioned configurations.
Troubleshooting
Using Log file
For advanced troubleshooting you can specify a log file to log system messages. Start Selenium GRID hub or node with -log argument. Please see the below example:
java -jar selenium-server-standalone.jar -role hub -log log.txt
Use your favorite text editor to open log file (log.txt in the example above) to find “ERROR” logs if you get issues.
Using -debug argument
Also you can use -debug argument to print debug logs to console.
Start Selenium Grid Hub or Node with -debug argument. Please see
the below example:
java -jar selenium-server-standalone.jar -role hub -debug
Warning
The Selenium Grid must be protected from external access using appropriate firewall permissions.
Failure to protect your Grid could result in one or more of the following occurring:
- You provide open access to your Grid infrastructure
- You allow third parties to access internal web applications and files
- You allow third parties to run custom binaries
See this blog post on Detectify, which gives a good overview of how a publicly exposed Grid could be misused: Don’t Leave your Grid Wide Open.
Docker Selenium
Docker provides a convenient way to provision and scale Selenium Grid infrastructure in a unit known as a container. Containers are standardised units of software that contain everything required to run the desired application, including all dependencies, in a reliable and repeatable way on different machines.
The Selenium project maintains a set of Docker images which you can download and run to get a working grid up and running quickly. Nodes are available for both Firefox and Chrome. Full details of how to provision a grid can be found within the Docker Selenium repository.
Prerequisite
The only requirement to run a Grid is to have Docker installed and working. Install Docker.
3 - Components of Grid 3
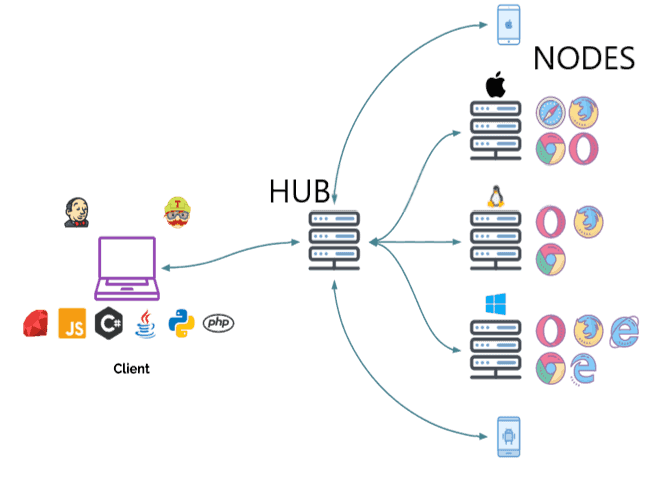
Hub
- Intermediary and manager
- Accepts requests to run tests
- Takes instructions from client and executes them remotely on the nodes
- Manages threads
A Hub is a central point where all your tests are sent. Each Selenium Grid consists of exactly one hub. The hub needs to be reachable from the respective clients (i.e. CI server, Developer machine etc.) The hub will connect one or more nodes that tests will be delegated to.
Nodes
- Where the browsers live
- Registers itself to the hub and communicates its capabilities
- Receives requests from the hub and executes them
Nodes are different Selenium instances that will execute tests on individual computer systems. There can be many nodes in a grid. The machines which are nodes do not need to be the same platform or have the same browser selection as that of the hub or the other nodes. A node on Windows might have the capability of offering Internet Explorer as a browser option, whereas this wouldn’t be possible on Linux or Mac.
4 - Migrating WebDriverJS off the Promise Manager
This documentation previously located on the wiki
The promise manager was removed in selenium-webdriver 4. The source links on this page point to
the selenium-3.6.0 tag.
Introduction
The WebDriverJS library uses a promise manager to ease the pain of working with a purely asynchronous API. Rather than writing a long chain of promises, the promise manager allows you to write code as if WebDriverJS had a synchronous, blocking API (like all of the other Selenium language bindings). For instance, instead of
const {Builder, By, until} = require('selenium-webdriver');
new Builder()
    .forBrowser('firefox')
    .build()
    .then(driver => {
      return driver.get('http://www.google.com/ncr')
        .then(_ => driver.findElement(By.name('q')).sendKeys('webdriver'))
        .then(_ => driver.findElement(By.name('btnK')).click())
        .then(_ => driver.wait(until.titleIs('webdriver - Google Search'), 1000))
        .then(_ => driver.quit());
    });
you can write
const {Builder, By, until} = require('selenium-webdriver');

let driver = new Builder()
    .forBrowser('firefox')
    .build();

driver.get('http://www.google.com/ncr');
driver.findElement(By.name('q')).sendKeys('webdriver');
driver.findElement(By.name('btnK')).click();
driver.wait(until.titleIs('webdriver - Google Search'), 1000);
driver.quit();
Unfortunately, there is no such thing as a free lunch. With WebDriverJS, using the promise
manager comes at the cost of increased complexity (for the Selenium maintainers–the
promise module
is a 3300 line beast) and reduced debuggability. For debugging, suppose you inserted a
debugger statement:
driver.get('http://www.google.com/ncr');
debugger;
driver.findElement(By.name('q')).sendKeys('webdriver');
When is this script going to pause - after WebDriver loads google.com, or after it schedules the command to load google.com? Since the promise manager abstracts away the async nature of the API, it hides that you need to explicitly use a callback to break after a command executes:
driver.get('http://www.google.com/ncr').then(() => debugger);
driver.findElement(By.name('q')).sendKeys('webdriver');
JavaScript has evolved in many ways since WebDriverJS was originally created. Not only did the community standardize the behavior and API for promises, but promises were added to the language itself. The next version of JavaScript, ES2017, adds support for async functions, greatly simplifying the process of writing and maintaining asynchronous code. At this point, the benefits of the promise manager no longer outweigh its costs, so it will soon be deprecated and removed from WebDriverJS. The remainder of this guide will explain how users can migrate off the promise manager and effectively use the async constructs available today.
Moving to async/await
Step 1: Disabling the Promise Manager
As outlined in issue 2969,
WebDriverJS’ promise manager will be deprecated and disabled by default with the first
Node LTS release that includes native
support for async functions. This feature is currently available in Node 7.x, hidden behind
the --harmony_async_await flag.
Instead of waiting for the LTS, you can disable the promise manager today either by setting
an environment variable, SELENIUM_PROMISE_MANAGER=0, or through the promise module’s API
(promise.USE_PROMISE_MANAGER = false).
When the promise manager is disabled, any attempt to create a managed promise will generate an error, so expect your scripts to fail the first time you try running with the promise manager.
Step 2: Migrate Direct Usages of Managed Promises
Search your code for every instance where you create a promise.Promise object, either
using the constructor, or the resolve/reject factories. Replace these calls with the
equivalent listed in the table below. These functions will automatically switch from
managed to native promises when the promise manager is disabled.
| Original | Replacement |
|---|---|
new promise.Promise() | promise.createPromise() |
promise.Promise.resolve() | promise.fulfilled() |
promise.Promise.reject() | promise.rejected() |
Step 3: Migrate Off of the Promise Manager
At this point, you should be ready to migrate off of the promise manager. Unfortunately, there’s no automated way to update your code; you basically have to disable the promise manager, see what fails, update some code, and try again. To understand how your code will fail, consider a test for our Google Search example:
const {Builder, By, until} = require('selenium-webdriver');
const test = require('selenium-webdriver/testing');

describe('Google Search', function() {
  let driver;

  test.before(function() {
    driver = new Builder().forBrowser('firefox').build();
  });

  test.it('example', function theTestFunction() {
    driver.get('http://www.google.com/ncr');                          // (1)
    driver.findElement(By.name('q')).sendKeys('webdriver');           // (2)
    driver.findElement(By.name('btnK')).click();                      // (3)
    driver.wait(until.titleIs('webdriver - Google Search'), 1000);    // (4)
  });

  test.after(function() {
    driver.quit();
  });
});
Inside theTestFunction, when the promise manager is enabled, it will capture every
WebDriver command and block its execution until those before it have completed. Thus, even
though driver.findElement() on line (2) is immediately scheduled, it will not start
execution until the command on line (1) completes.
When you disable the promise manager, every command will start executing as soon as it’s
scheduled. The exact behavior depends on the specific browser, but essentially, the command
to find an element on line (2) will start executing before the page requested on line
(1) has loaded.
You will need to update your code to explicitly link each action so it does not start until previous commands have finished. Presented below are three options for how to update your code.
Option 1: Use classic promise chaining
Your first option is to adopt classic promise chaining (yes, the very thing the promise
manager was created to avoid). This will make your code far more verbose, but it will work
with and without the promise manager and you won’t need to use the
selenium-webdriver/testing module for mocha-based tests.
const {Builder, By, until} = require('selenium-webdriver');
const test = require('selenium-webdriver/testing');

describe('Google Search', function() {
  let driver;

  before(function() {
    return new Builder().forBrowser('firefox').build().then(d => {
      driver = d;
    });
  });

  it('example', function theTestFunction() {
    return driver.get('http://www.google.com/ncr')
        .then(_ => driver.findElement(By.name('q')))
        .then(q => q.sendKeys('webdriver'))
        .then(_ => driver.findElement(By.name('btnK')))
        .then(b => b.click())
        .then(_ => driver.wait(until.titleIs('webdriver - Google Search'), 1000));
  });

  after(function() {
    return driver.quit();
  });
});
Option 2: Migrate to Generators
Your second option is to update your code to use asynchronous generator functions. The
selenium-webdriver/testing module already handles these out of the box. You can also use
third-party libraries like task.js for the same effect. Basically, change each of your test
functions to a generator, and yield on a promise. The generator wrapper will transparently
wait for the promise to resolve before resuming the function. It’s important to note,
however, asynchronous generators are not currently supported natively in JavaScript, so you
will have to use selenium-webdriver or another library for this to work.
const {Builder, By, until} = require('selenium-webdriver');
const test = require('selenium-webdriver/testing');

describe('Google Search', function() {
  let driver;

  test.before(function*() {
    driver = yield new Builder().forBrowser('firefox').build();
  });

  test.it('example', function* theTestFunction() {
    yield driver.get('http://www.google.com/ncr');                        // (1)
    yield driver.findElement(By.name('q')).sendKeys('webdriver');         // (2)
    yield driver.findElement(By.name('btnK')).click();                    // (3)
    yield driver.wait(until.titleIs('webdriver - Google Search'), 1000);  // (4)
  });

  test.after(function*() {
    yield driver.quit();
  });
});
The advantage to using generators with selenium-webdriver/testing is your code will work
with and without the promise manager, so you can convert one test at a time. Another
advantage to this approach is your code will work today with Node 6 & 7. When async/await
support is added to Node (it’s currently hidden behind a flag in Node 7), you can migrate
from generators with find-and-replace, converting function*() to async function() and
yield to await.
The selenium-webdriver/example
directory contains an example of our Google Search test written with and without generators
so you can compare the two side-by-side.
Option 3: Migrate to async/await
Your final option is to switch to async/await. As mentioned above, these language features
are currently hidden behind a flag in Node 7, so you will have to run with
--harmony_async_await or you will have to transpile your code with
Babel (setting up Babel is left as an exercise for the reader).
Compared to generators, there is one more catch to using async/await: they
do not play well with the promise manager,
so you must ensure the promise manager is disabled. There is a complete working example of a
test written using async/await provided in the
selenium-webdriver/example
directory:
const {Builder, By, until} = require('selenium-webdriver');

promise.USE_PROMISE_MANAGER = false;

describe('Google Search', function() {
  let driver;

  beforeEach(async function() {
    driver = await new Builder().forBrowser('firefox').build();
  });

  afterEach(async function() {
    await driver.quit();
  });

  it('example', async function() {
    await driver.get('https://www.google.com/ncr');

    await driver.findElement(By.name('q')).sendKeys('webdriver');
    await driver.findElement(By.name('btnK')).click();

    await driver.wait(until.titleIs('webdriver - Google Search'), 1000);
  });
});
This example disables the promise manager globally. In order to migrate tests bit-by-bit, you can selectively disable the promise manager in before/after blocks:
promise.USE_PROMISE_MANAGER = false;

function legacySuite(name, fn) {
  describe(name, function() {
    before(() => promise.USE_PROMISE_MANAGER = true);
    after(() => promise.USE_PROMISE_MANAGER = false);

    fn();
  });
}

describe('Example', function() {
  legacySuite('legacy tests', function() {
    test.it('test 1', function() {
      // ...
    });
  });

  it('test 2', async function() {
    // ...
  });
});
Miscellaneous Tips
Use Logging To Find Unmigrated Code
While the promise manager can be easily toggled through an environment variable, constantly
running your code in the two modes can be tedious. Selenium’s promise module provides
logging to report every instance of unsynchronized code running through the promise manager
(which, in code, is actually called the ControlFlow). You can enable this logging, then
work through the messages to update each instance of commands that have not been properly
chained (depending on the option you chose above).
Enabling logging is only two extra lines:
const {Builder, By, logging, until} = require('selenium-webdriver');

logging.installConsoleHandler();
logging.getLogger('promise.ControlFlow').setLevel(logging.Level.ALL);

let driver = new Builder()
    .forBrowser('firefox')
    .build();

driver.get('http://www.google.com/ncr');
driver.findElement(By.name('q')).sendKeys('webdriver');
driver.findElement(By.name('btnK')).click();
driver.wait(until.titleIs('webdriver - Google Search'), 1000);
driver.quit();
With logging, the example above will produce messages like:
[2017-03-06T02:18:14Z] [WARNING] [promise.ControlFlow] Detected scheduling of an unchained task.
    When the promise manager is disabled, unchained tasks will not wait for
    previously scheduled tasks to finish before starting to execute.
    New task: Task: WebDriver.navigate().to(http://www.google.com/ncr)
        at thenableWebDriverProxy.schedule (/path/to/node_modules/selenium-webdriver/lib/webdriver.js:816:17)
        at Navigation.to (/path/to/node_modules/selenium-webdriver/lib/webdriver.js:1140:25)
        at thenableWebDriverProxy.get (/path/to/node_modules/selenium-webdriver/lib/webdriver.js:997:28)
        at Object.<anonymous> (/path/to/test/log.js:10:8)
        ...
    Previous task: Task: WebDriver.createSession()
        at Function.createSession (/path/to/node_modules/selenium-webdriver/lib/webdriver.js:777:24)
        at Function.createSession (/path/to/node_modules/selenium-webdriver/firefox/index.js:667:55)
        at createDriver (/path/to/node_modules/selenium-webdriver/index.js:167:33)
        at Builder.build (/path/to/node_modules/selenium-webdriver/index.js:642:16)
        at Object.<anonymous> (/path/to/test/log.js:8:6)
        ...
5 - Selenium 3 Python Bindings
This documentation previously located on the wiki
For current information, read the WebDriver documentation.
Installation
Selenium officially supports python 2.7 and 3.6, however other versions should also work.
The latest official release is available on the Python Package Index. It’s a good practice to install python packages into virtual environments rather than in your global site packages. To install this using pip, run the following command:
pip install selenium
Usage
Importing the module is performed by entering the following in your python shell:
Firefox
from selenium import webdriver
driver = webdriver.Firefox()
Google Chrome
from selenium import webdriver
driver = webdriver.Chrome()
Remote
from selenium import webdriver
driver = webdriver.Remote(browser_name="firefox", platform="any")
Internet Explorer
from selenium import webdriver
driver = webdriver.Ie()
Microsoft Edge
from selenium import webdriver
driver = webdriver.Edge()
Safari
from selenium import webdriver
driver = webdriver.Safari()
Documentation
The documentation is available online here and can by built locally using the command tox -e docs.
Interactive
Alternatively use your python shell to view all commands available to you, after importing perform:
dir(webdriver)
To view the docstrings (documentation text attached to a function or method), perform
print('functionname'.__doc__)
Where functionname is the function you wish to view more information on. For example,
print(selenium.open.__doc__)
Comparison with Java Bindings
Here is a summary of the major differences between the python and Java bindings.
Function Names
Function names separate compound terms with underscores, rather than using Java’s camelCase formatting. For example, in python title is the equivalent of getTitle() in Java.
Flatter Structures
To reflect pythonic behavior of flat object hierarchies the python bindings e.g. find_element_by_xpath("//h1") rather than findElement(By.xpath("//h1")); but it does give you the freedom of doing find_element(by=By.XPATH, value='//h1')
Development
To install the latest unreleased version, clone https://github.com/SeleniumHQ/selenium and run the following commands from the repository root directory:
./go py_prep_for_install_release
cd py
python setup.py install
Style
Code Style
Code should adhere to Flake8 with the exception of E501.
Docstring Style
Docstrings should adhere to PEP257. Arguments, return values, exceptions, etc should use reStructuredText.
Tests
When developing Selenium, it is recommended you run the tests before and after making any changes to the code base. To perform these tests, you will first need to install Tox.
Note that you will either need to change to the
pysubdirectory when runningtox, or point to the configuration file usingtox -c py/tox.ini.
By default, running tox will attempt to execute all of the defined environments. This means the tests for python 2.7 and 3.6 will run for each of the supported drivers. This is most likely not what you want, as some drivers will not run on certain platforms. It is therefore recommended that you specify the environments you wish to execute. To list all environments available, run tox -l, and to execute a single environment, use tox -e.
As an example, this command will run the tests for Firefox against python 2.7:
tox -e py27-marionette
The tests are executed using pytest, and you can pass positional arguments through Tox by specifying -- before them. In addition to other things, this allows you to filter tests. For example, to run a single test file:
tox -e py27-marionette -- py/test/selenium/webdriver/common/visibility_tests.py
To run a single test, you can use the keyword filter, such as:
tox -e py27-marionette -- -k testShouldShowElementNotVisibleWithHiddenAttribute
Expected Failures
Unfortunately, there will be some tests that are expected to fail due to known issues. You can mark these tests using the standard pytest methods, however if the test uses the driver fixture to run against multiple drivers, this will mark the tests for all of those drivers. If a test is only expected to fail in a subset of drivers, you can extend the xfail mark with the name of the driver. For example, to mark a test as expected to fail in Chrome and Firefox (but pass using any other driver):
import pytest

@pytest.mark.xfail_chrome
@pytest.mark.xfail_firefox
def test_something(driver):
   assert something is True
All of the same arguments from pytest’s xfail mark are available to these extended marks. Wherever possible you should provide a reason with a reference to the raised issue/bug. If the test raises an unexpected exception you should also provide the raises argument, as this will still cause a failure if the test starts failing for another reason.
If the expected failure is dependent on the platform, you should also include the condition argument so that the test will be allowed to pass on other environments. For example, to mark a test as expected to fail when run against Firefox on macOS:
import sys
import pytest
from selenium.common.exceptions import WebDriverException

@pytest.mark.xfail_firefox(
    condition=sys.platform == 'darwin',
    reason='https://myissuetracker.com/issue?id=1234',
    raises=WebDriverException
def test_something(driver):
   assert something is True
You should avoid using imperative xfail as these will never allow the test an opportunity to unexpectedly pass (when the issue is resolved).
We also recommend against using skip unless there is good reason. If your test failure causes a hang or some other undesirable side-effect you can pass run=False to the xfail mark.
To run expected failures locally, pass the --runxfail command line option to pytest. If you want to run all expected failures for a specific driver you can do this by filtering on the xfail mark:
tox -e py27-marionette -- -m xfail_marionette --runxfail
Releases
To perform a release you will need to be a maintainer of the package on PyPI. Before pushing a new release you will need to update the version number and change log. The version number is in the form of X.Y.Z, where X.Y is taken from the latest GitHub release, and Z increments for each release.
When you’re ready, the release can be made by running the following command:
./go py_release
6 - Selenium 3 Ruby Bindings
This documentation previously located on the wiki
For current information, read the WebDriver documentation.
Introduction
The Ruby bindings for Selenium/WebDriver are available as the selenium-webdriver gem. The web page explains how to install the selenium-webdriver gem. If you’re looking for a slightly higher level API built on the same technology, you may want to check out watir or capybara.
The bindings support Ruby 2.1 through 2.4.
API Example
require "selenium-webdriver"

driver = Selenium::WebDriver.for :firefox
driver.navigate.to "http://google.com"

element = driver.find_element(name: 'q')
element.send_keys "Hello WebDriver!"
element.submit

puts driver.title

driver.quit
Driver examples:
# execute arbitrary javascript
puts driver.execute_script("return window.location.pathname")

# pass elements between Ruby and JavaScript
element = driver.execute_script("return document.body")
driver.execute_script("return arguments[0].tagName", element) #=> "BODY"

# wait for a specific element to show up
wait = Selenium::WebDriver::Wait.new(timeout: 10) # seconds
wait.until { driver.find_element(id: "foo") }

# switch to a frame
driver.switch_to.frame "some-frame" # id
driver.switch_to.frame driver.find_element(id: 'some-frame') # frame element

# switch back to the main document
driver.switch_to.default_content

# repositioning and resizing browser window:
driver.manage.window.move_to(300, 400)
driver.manage.window.resize_to(500, 800)
driver.manage.window.maximize
Element examples:
# get an attribute
class_name = element.attribute("class")

# is the element visible on the page?
element.displayed?

# click the element
element.click

# get the element location
element.location

# scroll the element into view, then return its location
element.location_once_scrolled_into_view

# get the width and height of an element
element.size

# press space on an element - see Selenium::WebDriver::Keys for possible values
element.send_keys :space

# get the text of an element
element.text
Advanced user interactions (see ActionBuilder):
driver.action.key_down(:shift).
              click(element).
              double_click(second_element).
              key_up(:shift).
              drag_and_drop(element, third_element).
              perform
IE
Make sure that Internet Options → Security has the same Protected Mode setting (on or off, it doesn’t matter as long as it is the same value) for all zones.
Chrome
Command line switches
For a list of switches, see this list.
options = Selenium::WebDriver::Chrome::Options.new
options.add_argument('--ignore-certificate-errors')
options.add_argument('--disable-popup-blocking')
options.add_argument('--disable-translate')
driver = Selenium::WebDriver.for :chrome, options: options
Tweaking profile preferences
prefs = {
  prompt_for_download: false,
  default_directory: "/path/to/dir"
}
options = Selenium::WebDriver::Chrome::Options.new
options.add_preference(:download, prefs)
driver = Selenium::WebDriver.for :chrome, options: options
See ChromeDriver documentation.
Remote
The RemoteWebDriver makes it easy to control a browser running on another machine. Download the Selenium Standalone Server (from Downloads) and launch:
java -jar selenium-server-standalone.jar
Then connect to it from Ruby
driver = Selenium::WebDriver.for :remote
By default, this connects to the server running on localhost:4444 and opens Chrome. To connect to another machine, use the :url option:
driver = Selenium::WebDriver.for :remote, url: "http://myserver:4444/wd/hub"
To launch another browser with the default capabilities, use the :desired_capabilities option:
driver = Selenium::WebDriver.for :remote, desired_capabilities: :firefox
You can also pass an instance of Selenium::WebDriver::Remote::Capabilities, e.g.:
caps = Selenium::WebDriver::Remote::Capabilities.internet_explorer(native_events: false)
driver = Selenium::WebDriver.for :remote, desired_capabilities: caps
You can change arbitrary capabilities:
caps = Selenium::WebDriver::Remote::Capabilities.internet_explorer
caps['enablePersistentHover'] = false

driver = Selenium::WebDriver.for :remote, desired_capabilities: caps
You may want to set the proxy settings of the remote browser (this currently only works for Firefox):
caps = Selenium::WebDriver::Remote::Capabilities.firefox(proxy: Selenium::WebDriver::Proxy.new(http: "myproxyaddress:8080"))
driver = Selenium::WebDriver.for :remote, desired_capabilities: caps
Or if you have a proxy in front of the remote server:
client = Selenium::WebDriver::Remote::Http::Default.new
client.proxy = Selenium::Proxy.new(http: "proxy.org:8080")

driver = Selenium::WebDriver.for :remote, http_client: client
See Proxy documentation for more options.
For the remote Firefox driver you can configure the profile, see the section Tweaking Firefox preferences.
Firefox
Ruby currently includes support for Legacy FirefoxDriver (used in Firefox versions < 48), and the new geckodriver. As of Selenium 3.x, Geckodriver is the default implementation. If you want to use the Legacy Driver with an older version of Firefox you can do:
capabilities = Selenium::WebDriver::Remote::Capabilities.firefox(marionette: false)
Selenium::WebDriver.for :firefox, desired_capabilities: capabilities
Both implementations allow you configure the profile used. The examples below, however, are for GeckoDriver.
Adding an extension
profile = Selenium::WebDriver::Firefox::Profile.new
profile.add_extension("/path/to/extension.xpi")
options = Selenium::WebDriver::Firefox::Options.new
options.profile = profile
driver = Selenium::WebDriver.for :firefox, options: options
Using an existing profile
You can use an existing profile as a template for the WebDriver profile by passing the profile name (see firefox -ProfileManager to set up custom profiles.)
options = Selenium::WebDriver::Firefox::Options.new
options.profile = "my-existing-profile"
driver = Selenium::WebDriver.for :firefox, options: options
If you want to use your default profile, pass profile = "default"
You can also get a Profile instance for an existing profile and tweak its preferences. This does not modify the existing profile, only the one used by WebDriver.
default_profile = Selenium::WebDriver::Firefox::Profile.from_name "default"
default_profile.assume_untrusted_certificate_issuer = false

options = Selenium::WebDriver::Firefox::Options.new(profile: default_profile)
driver = Selenium::WebDriver.for :firefox, options: options
Tweaking Firefox preferences
Use a proxy:
profile = Selenium::WebDriver::Firefox::Profile.new
proxy = Selenium::WebDriver::Proxy.new(http: "proxy.org:8080")
profile.proxy = proxy
options = Selenium::WebDriver::Firefox::Options.new(profile: profile)
driver = Selenium::WebDriver.for :firefox, options: options
Automatically download files to a given folder:
profile = Selenium::WebDriver::Firefox::Profile.new
profile['browser.download.dir'] = "/tmp/webdriver-downloads"
profile['browser.download.folderList'] = 2
profile['browser.helperApps.neverAsk.saveToDisk'] = "application/pdf"
profile['pdfjs.disabled'] = true
options = Selenium::WebDriver::Firefox::Options.new(profile: profile)
driver = Selenium::WebDriver.for :firefox, options: options
If you are using the remote driver you can still configure the Firefox profile:
profile = Selenium::WebDriver::Firefox::Profile.new
profile['foo.bar'] = true

capabilities = Selenium::WebDriver::Remote::Capabilities.firefox(firefox_profile: profile)
driver = Selenium::WebDriver.for :remote, desired_capabilities: capabilities
For a list of possible preferences, see this page.
Custom Firefox path
If your Firefox executable is in a non-standard location:
options = Selenium::WebDriver::Firefox::Options.new
options.binary = "/path/to/firefox"
driver = Selenium::WebDriver.for :firefox, options: options
SSL Certificates
The Legacy Firefox driver ignores invalid SSL certificates by default. If this is not the behavior you want, you can do:
profile = Selenium::WebDriver::Firefox::Profile.new
profile.secure_ssl = true
driver = Selenium::WebDriver.for :firefox, profile: profile
geckodriver will not implicitly trust untrusted or self-signed TLS certificates on navigation. To override this you can do:
capabilities = Selenium::WebDriver::Remote::Capabilities.firefox(accept_insecure_certs: true)
driver = Selenium::WebDriver.for :firefox, desired_capabilities: capabilities
Safari
As of 3.0, the only supported safari driver is the one maintained by Apple. It requires Safari 10 or greater; support for earlier versions of Safari has been removed.
driver = Selenium::WebDriver.for :safari
driver.navigate.to "http://apple.com"
Technology Preview
The latest code for the Safari Driver is bundled with the Safari Technology Preview. To use it:
Selenium::WebDriver::Safari.driver_path = "/Applications/Safari\ Technology\ Preview.app/Contents/MacOS/safaridriver"
driver = Selenium::WebDriver.for :safari
Timeouts
Implicit waits
WebDriver lets you configure implicit waits, so that a call to #find_element will wait for a specified amount of time before raising a NoSuchElementError:
  driver = Selenium::WebDriver.for :firefox
  driver.manage.timeouts.implicit_wait = 3 # seconds
Explicit waits
Use the Wait class to explicitly wait for some condition:
  wait = Selenium::WebDriver::Wait.new(timeout: 3)
  wait.until { driver.find_element(id: "cheese").displayed? }
Internal timeouts
Internally, WebDriver uses HTTP to communicate with a lot of the drivers (the JsonWireProtocol). By default, Net::HTTP from Ruby’s standard library is used, which has a default timeout of 60 seconds. If you call e.g. Driver#get, Driver#click on a page that takes more than 60 seconds to load, you’ll see a Timeout::Error raised from Net::HTTP. You can configure this timeout (before launching a browser) by doing:
  client = Selenium::WebDriver::Remote::Http::Default.new
  client.read_timeout = 120 # seconds
  driver = Selenium::WebDriver.for :remote, http_client: client
JavaScript dialogs
You can use WebDriver to handle Javascript alert(), prompt() and confirm() dialogs.
The API for all three is the same.
require "selenium-webdriver"

driver = Selenium::WebDriver.for :firefox
driver.navigate.to "http://mysite.com/page_with_alert.html"

driver.find_element(name: 'element_with_alert_javascript').click
a = driver.switch_to.alert
if a.text == 'A value you are looking for'
  a.dismiss
else
  a.accept
end
Using Curb or your own HTTP client
For internal HTTP communication, Net::HTTP is used by default. If you e.g. have the Curb gem installed, you can switch to it by doing:
require 'selenium/webdriver/remote/http/curb'

client = Selenium::WebDriver::Remote::Http::Curb.new
driver = Selenium::WebDriver.for :firefox, http_client: client
Using persistent HTTP connections
If you have the net-http-persistent gem installed, you can use it to get keep-alive connections. This will significantly reduce the ephemeral ports usage of WebDriver, which is useful in some contexts. Keep-alive connections are also supported in ChromeDriver.
require 'selenium/webdriver/remote/http/persistent'

client = Selenium::WebDriver::Remote::Http::Persistent.new
driver = Selenium::WebDriver.for :chrome, http_client: client
Logging
There is built-in logger available, by default it prints only warning messages. If you want to enable more verbose logging, add this to your code:
Selenium::WebDriver.logger.level = :info
If you want full logging enabled:
Selenium::WebDriver.logger.level = :debug
By default, logger prints messages to standard output, but you can also write to a file:
Selenium::WebDriver.logger.output = 'selenium.log'